Build a Blind App
This is the 3rd step in the Blind App Quickstart. Before starting this guide,
- Install the Nillion SDK
- Create a Nada project and write your first Nada program
Setting up a new project
There are two pathways to creating a nillion starter repo.
1. Template Approach
Use our out-of-the-box react app by cloning our cra-nillion repository.
OR
2. New Project
Create a brand new React / Nextjs app from scratch.
- Template
- New project
The cra-nillion Starter Repo repo is a Create React App which has everything you need to start building your blind app.
Clone the CRA-Nillion JavaScript starter repo
Make sure you are in the root of the quickstart directory. Clone the repo into your quickstart directory.
git clone https://github.com/NillionNetwork/cra-nillion.git
Install repo dependencies and run the starter
Before you use cra-nillion, check that you have Node (>= v18.17) installed by running
node -v
cd cra-nillion
npm i
npm start
Open http://localhost:8080/ to see your cra-nillion starter app running locally at port 8080
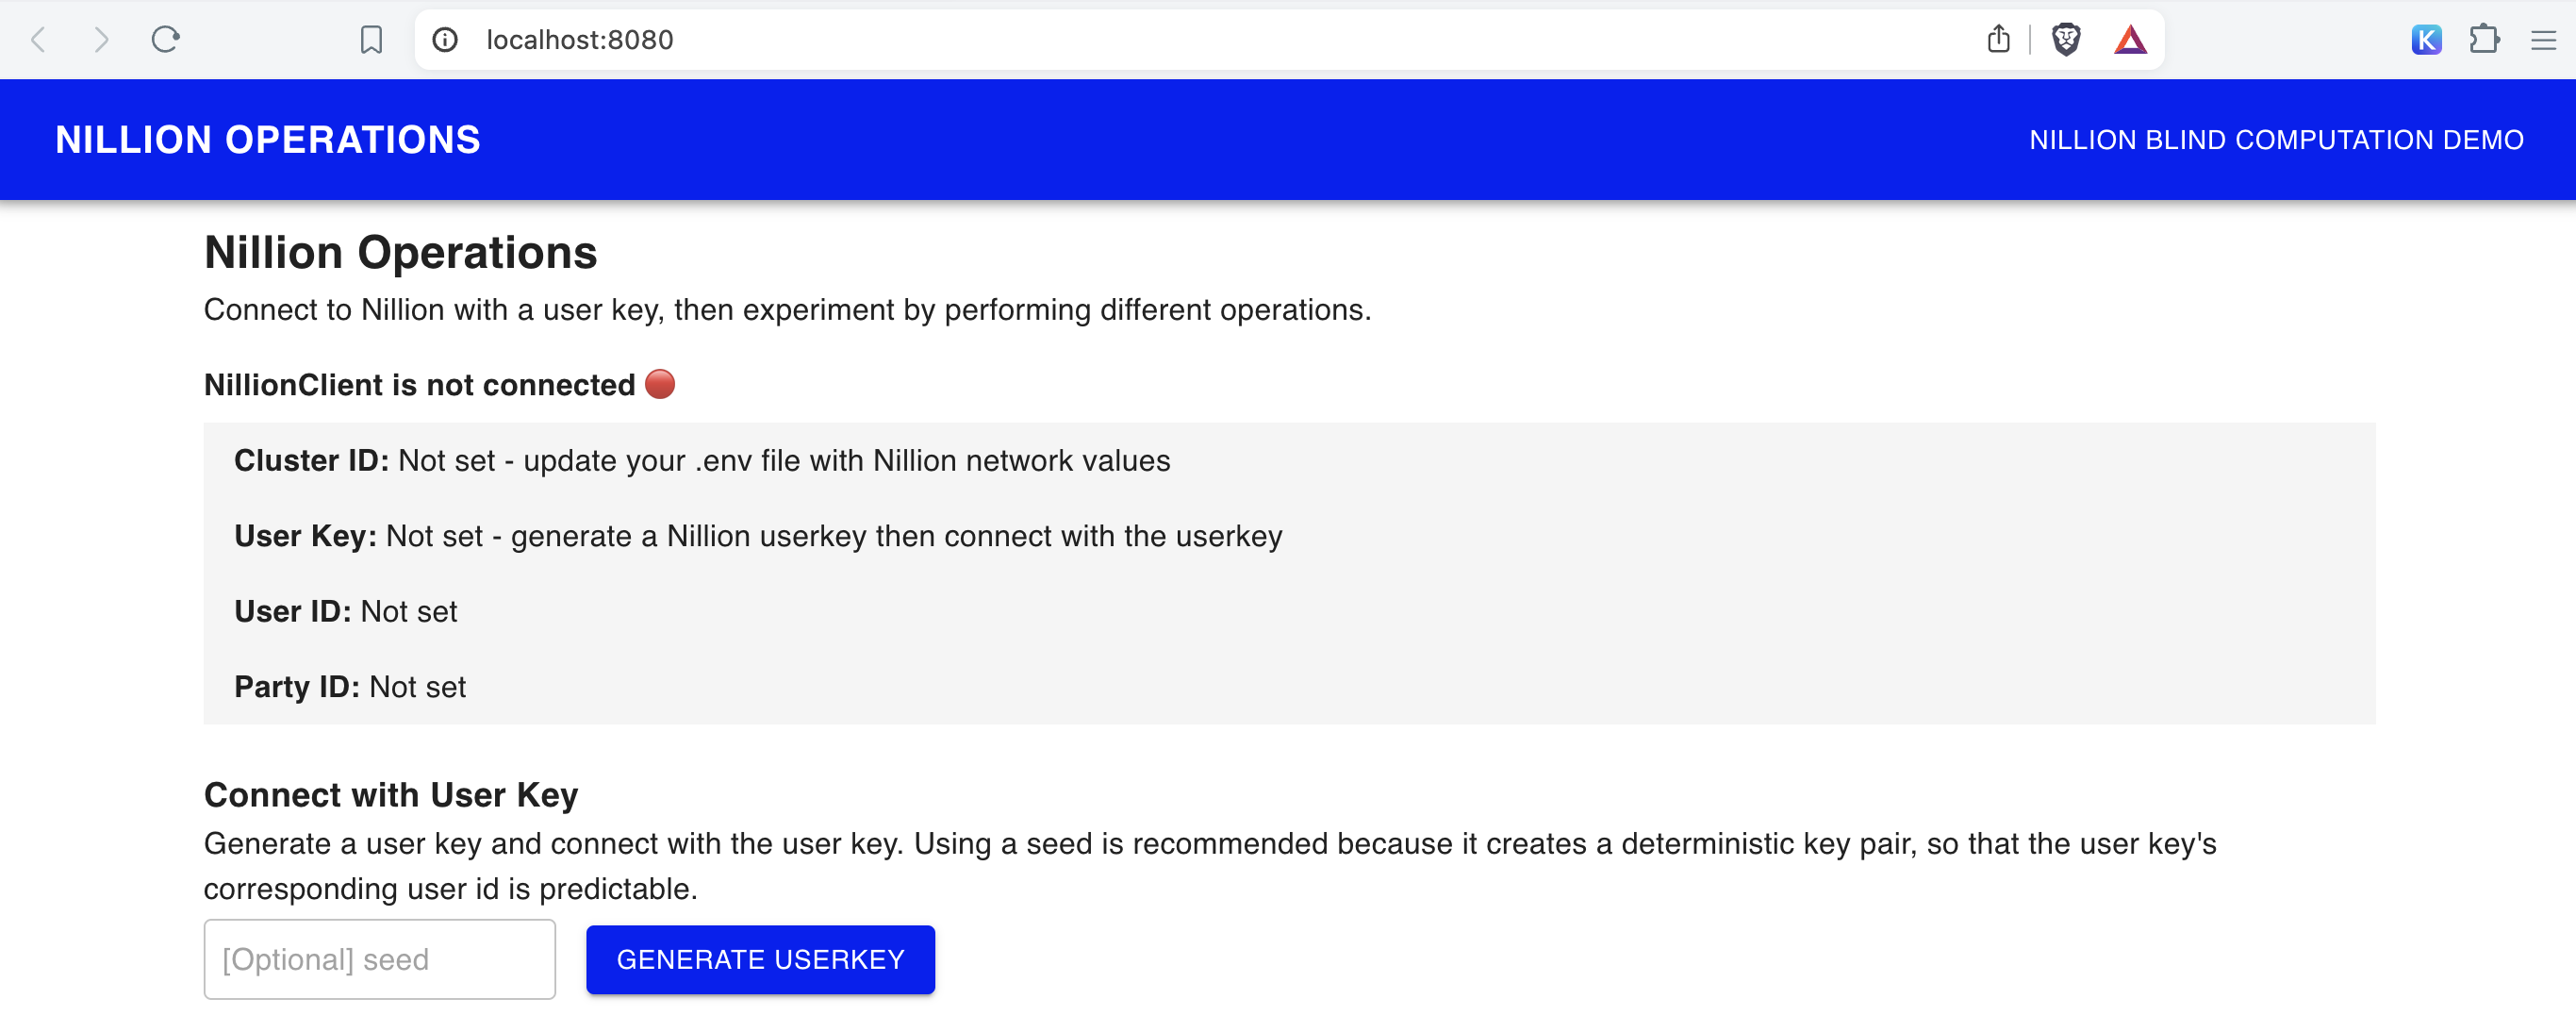
For this Quickstart, we'll focus on the Nillion Operations page and the Nillion Blind Computation Demo page.
Connect the blind app to nillion-devnet
In the screenshot of cra-nillion, you'll notice that cluster id and other configuration variables needed to connect to the Nillion Network are not set, so it's not possible to connect NillionClient.
Spin up a local Nillion devnet
Open a second terminal and run the devnet using any seed (the example uses "my-seed") so the cluster id, websockets, and other environment variables stay constant even when you restart nillion-devnet.
nillion-devnet --seed my-seed
You will see an output like this:
nillion-devnet --seed my-seed
ℹ️ cluster id is 222257f5-f3ce-4b80-bdbc-0a51f6050996
ℹ️ using 256 bit prime
ℹ️ storing state in /var/folders/1_/2yw8krkx5q5dn2jbhx69s4_r0000gn/T/.tmpU00Jbm (62.14Gbs available)
🏃 starting nilchain node in: /var/folders/1_/2yw8krkx5q5dn2jbhx69s4_r0000gn/T/.tmpU00Jbm/nillion-chain
⛓  nilchain JSON RPC available at http://127.0.0.1:48102
⛓  nilchain gRPC available at localhost:26649
🏃 starting node 12D3KooWMGxv3uv4QrGFF7bbzxmTJThbtiZkHXAgo3nVrMutz6QN
⏳ waiting until bootnode is up...
🏃 starting node 12D3KooWKkbCcG2ujvJhHe5AiXznS9iFmzzy1jRgUTJEhk4vjF7q
🏃 starting node 12D3KooWMgLTrRAtP9HcUYTtsZNf27z5uKt3xJKXsSS2ohhPGnAm
👛 funding nilchain keys
📝 nillion CLI configuration written to /Users/steph/Library/Application Support/nillion.nillion/config.yaml
🌄 environment file written to /Users/steph/Library/Application Support/nillion.nillion/nillion-devnet.env
Copy the path printed after "🌄 environment file written to" and open the file
vim "/Users/steph/Library/Application Support/nillion.nillion/nillion-devnet.env"
This file has the nillion-devnet generated values for cluster id, websocket, json rpc, and private key. You'll need to put these in your local .env in one of the next steps so that your cra-nillion demo app connects to the nillion-devnet.
Keep the nillion-devnet running in this terminal.
Create .env file
Make sure you are in the quickstart/cra-nillion directory.
Copy the up the .env.example file to a new .env and set up these variables to match the nillion environment file.
cp .env.example .env
Update your newly created .env with environment variables outout in your terminal by nillion-devnet
REACT_APP_NILLION_CLUSTER_ID=
REACT_APP_NILLION_BOOTNODE_WEBSOCKET=
REACT_APP_NILLION_NILCHAIN_JSON_RPC=
REACT_APP_NILLION_NILCHAIN_PRIVATE_KEY=
REACT_APP_API_BASE_PATH=/nilchain-proxy

# Optional: add your ETH Address to enable JavaScript Client Telemetry
REACT_APP_YOUR_ETHEREUM_ADDRESS_FOR_NILLION_TELEMETRY=
Restart the cra-nillion app process
npm start
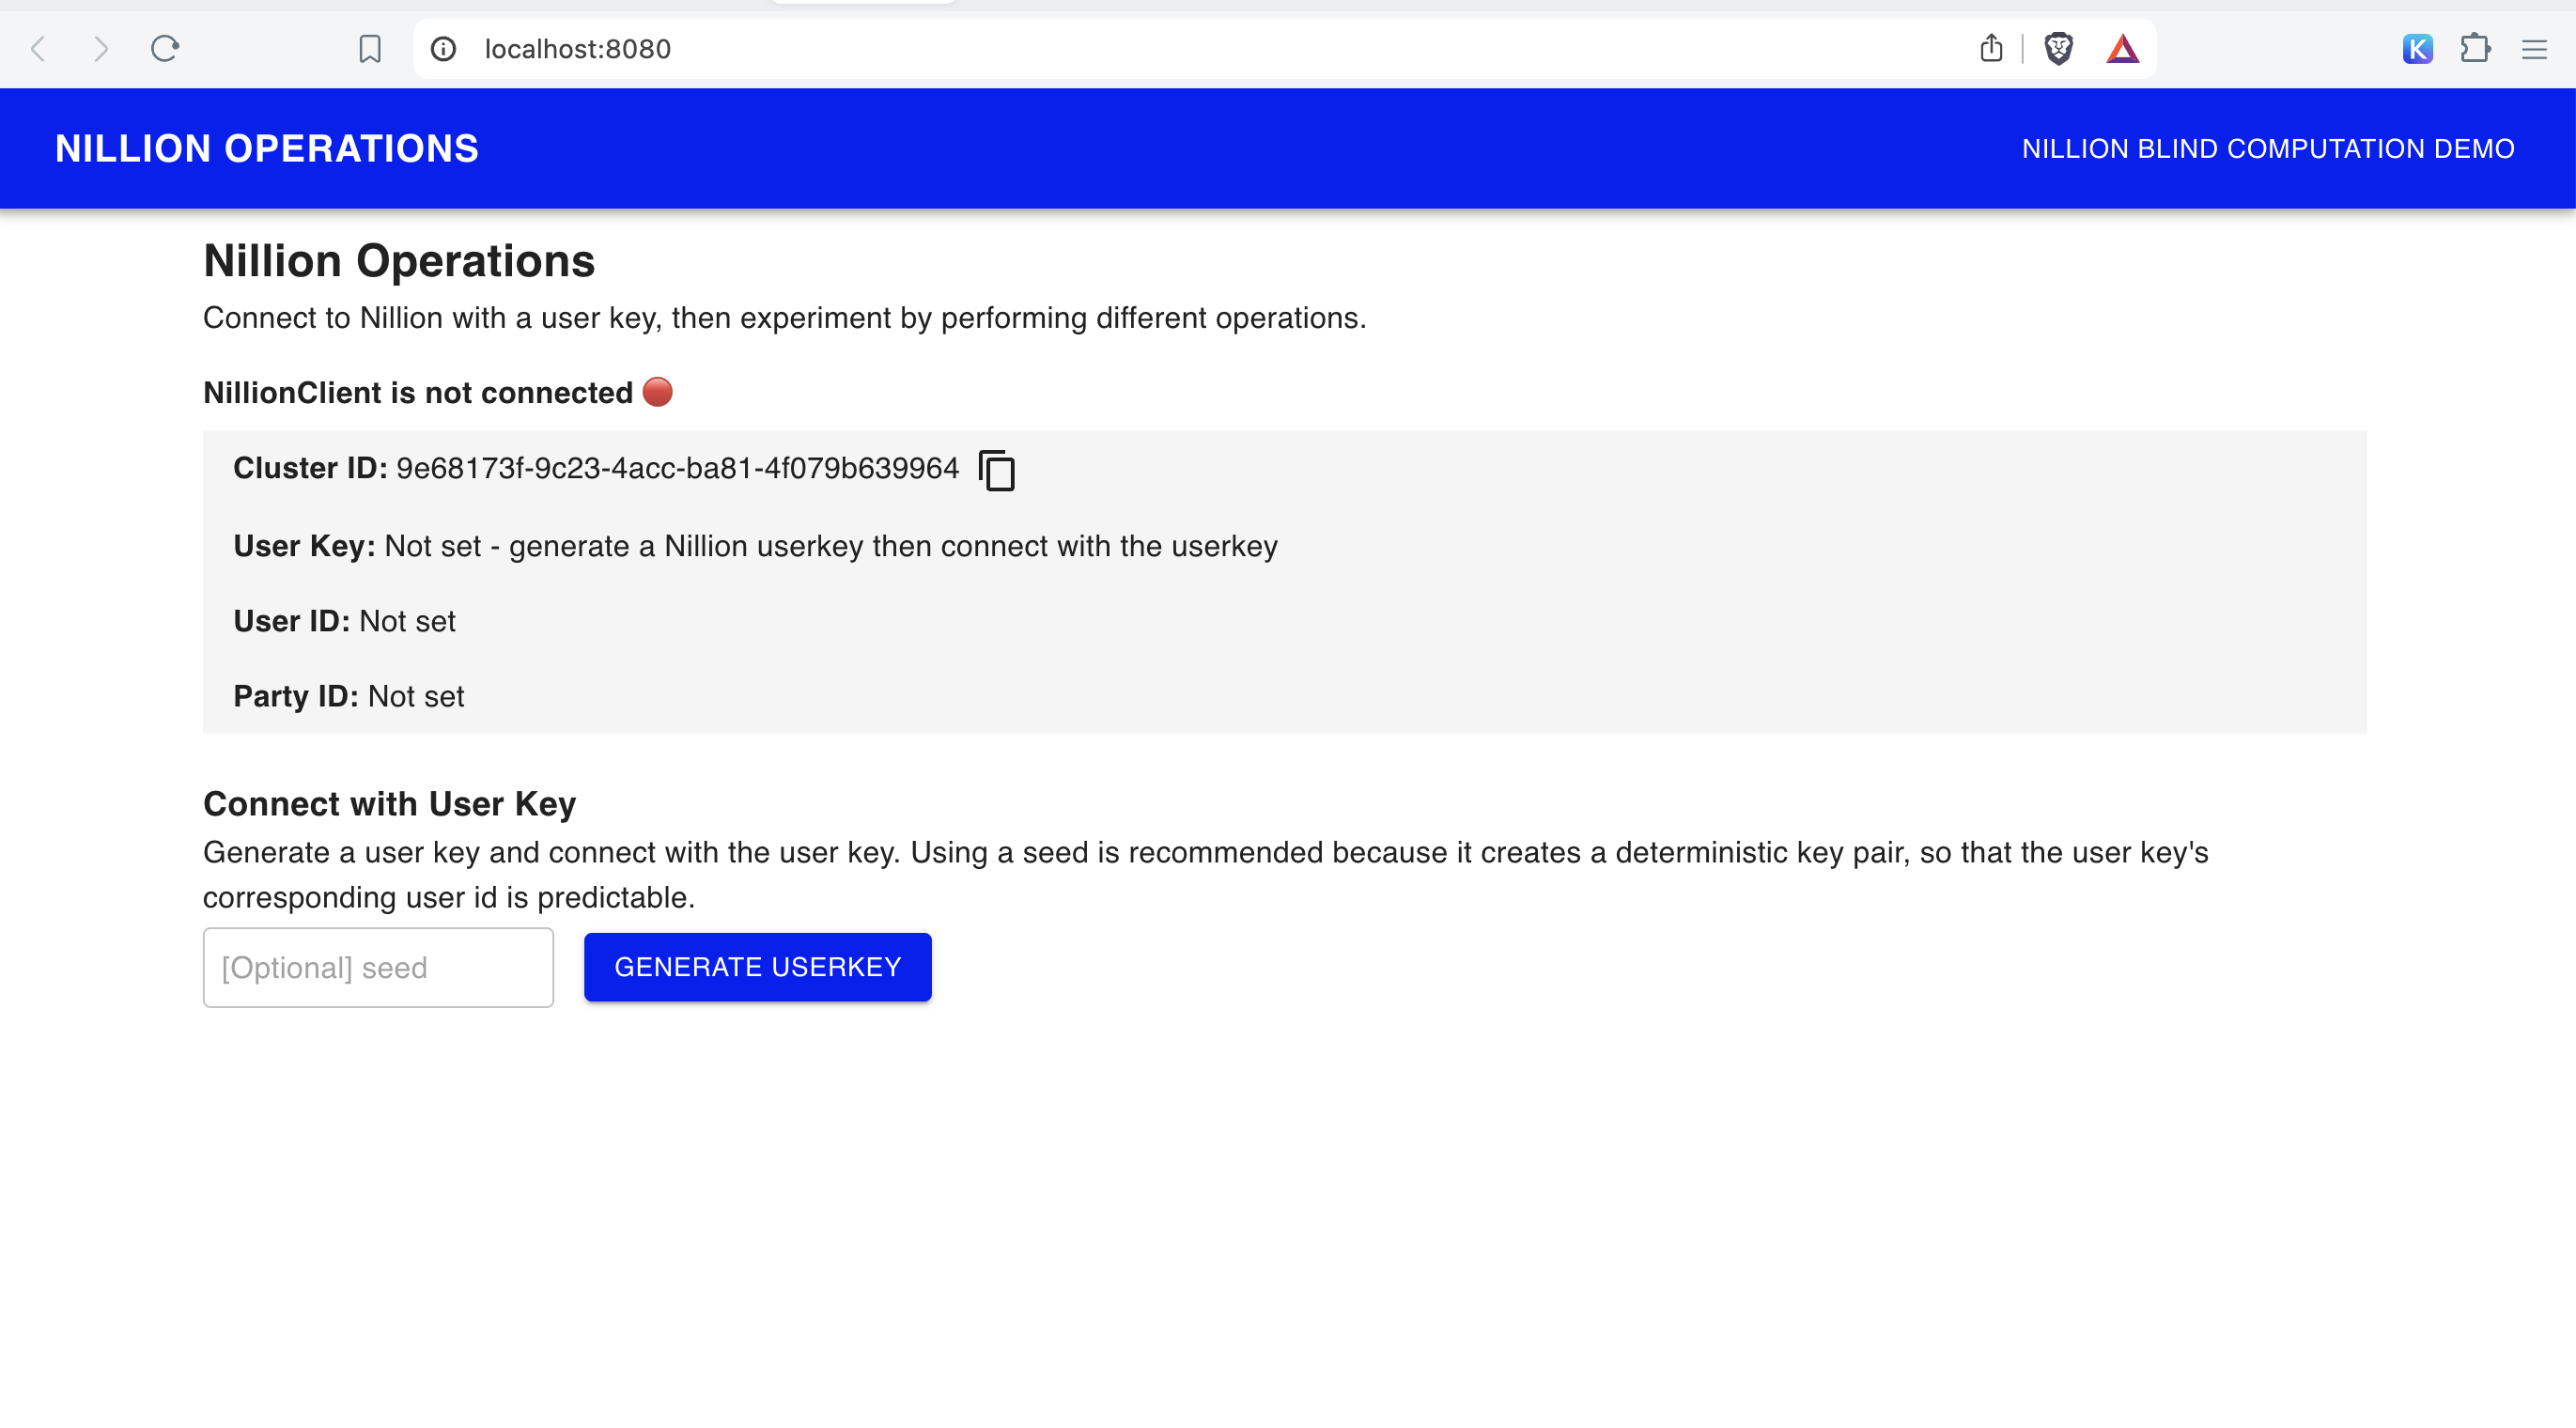
Now the Cluster ID field should be populated with the nillion-devnet cluster id value you set in REACT_APP_NILLION_CLUSTER_ID.
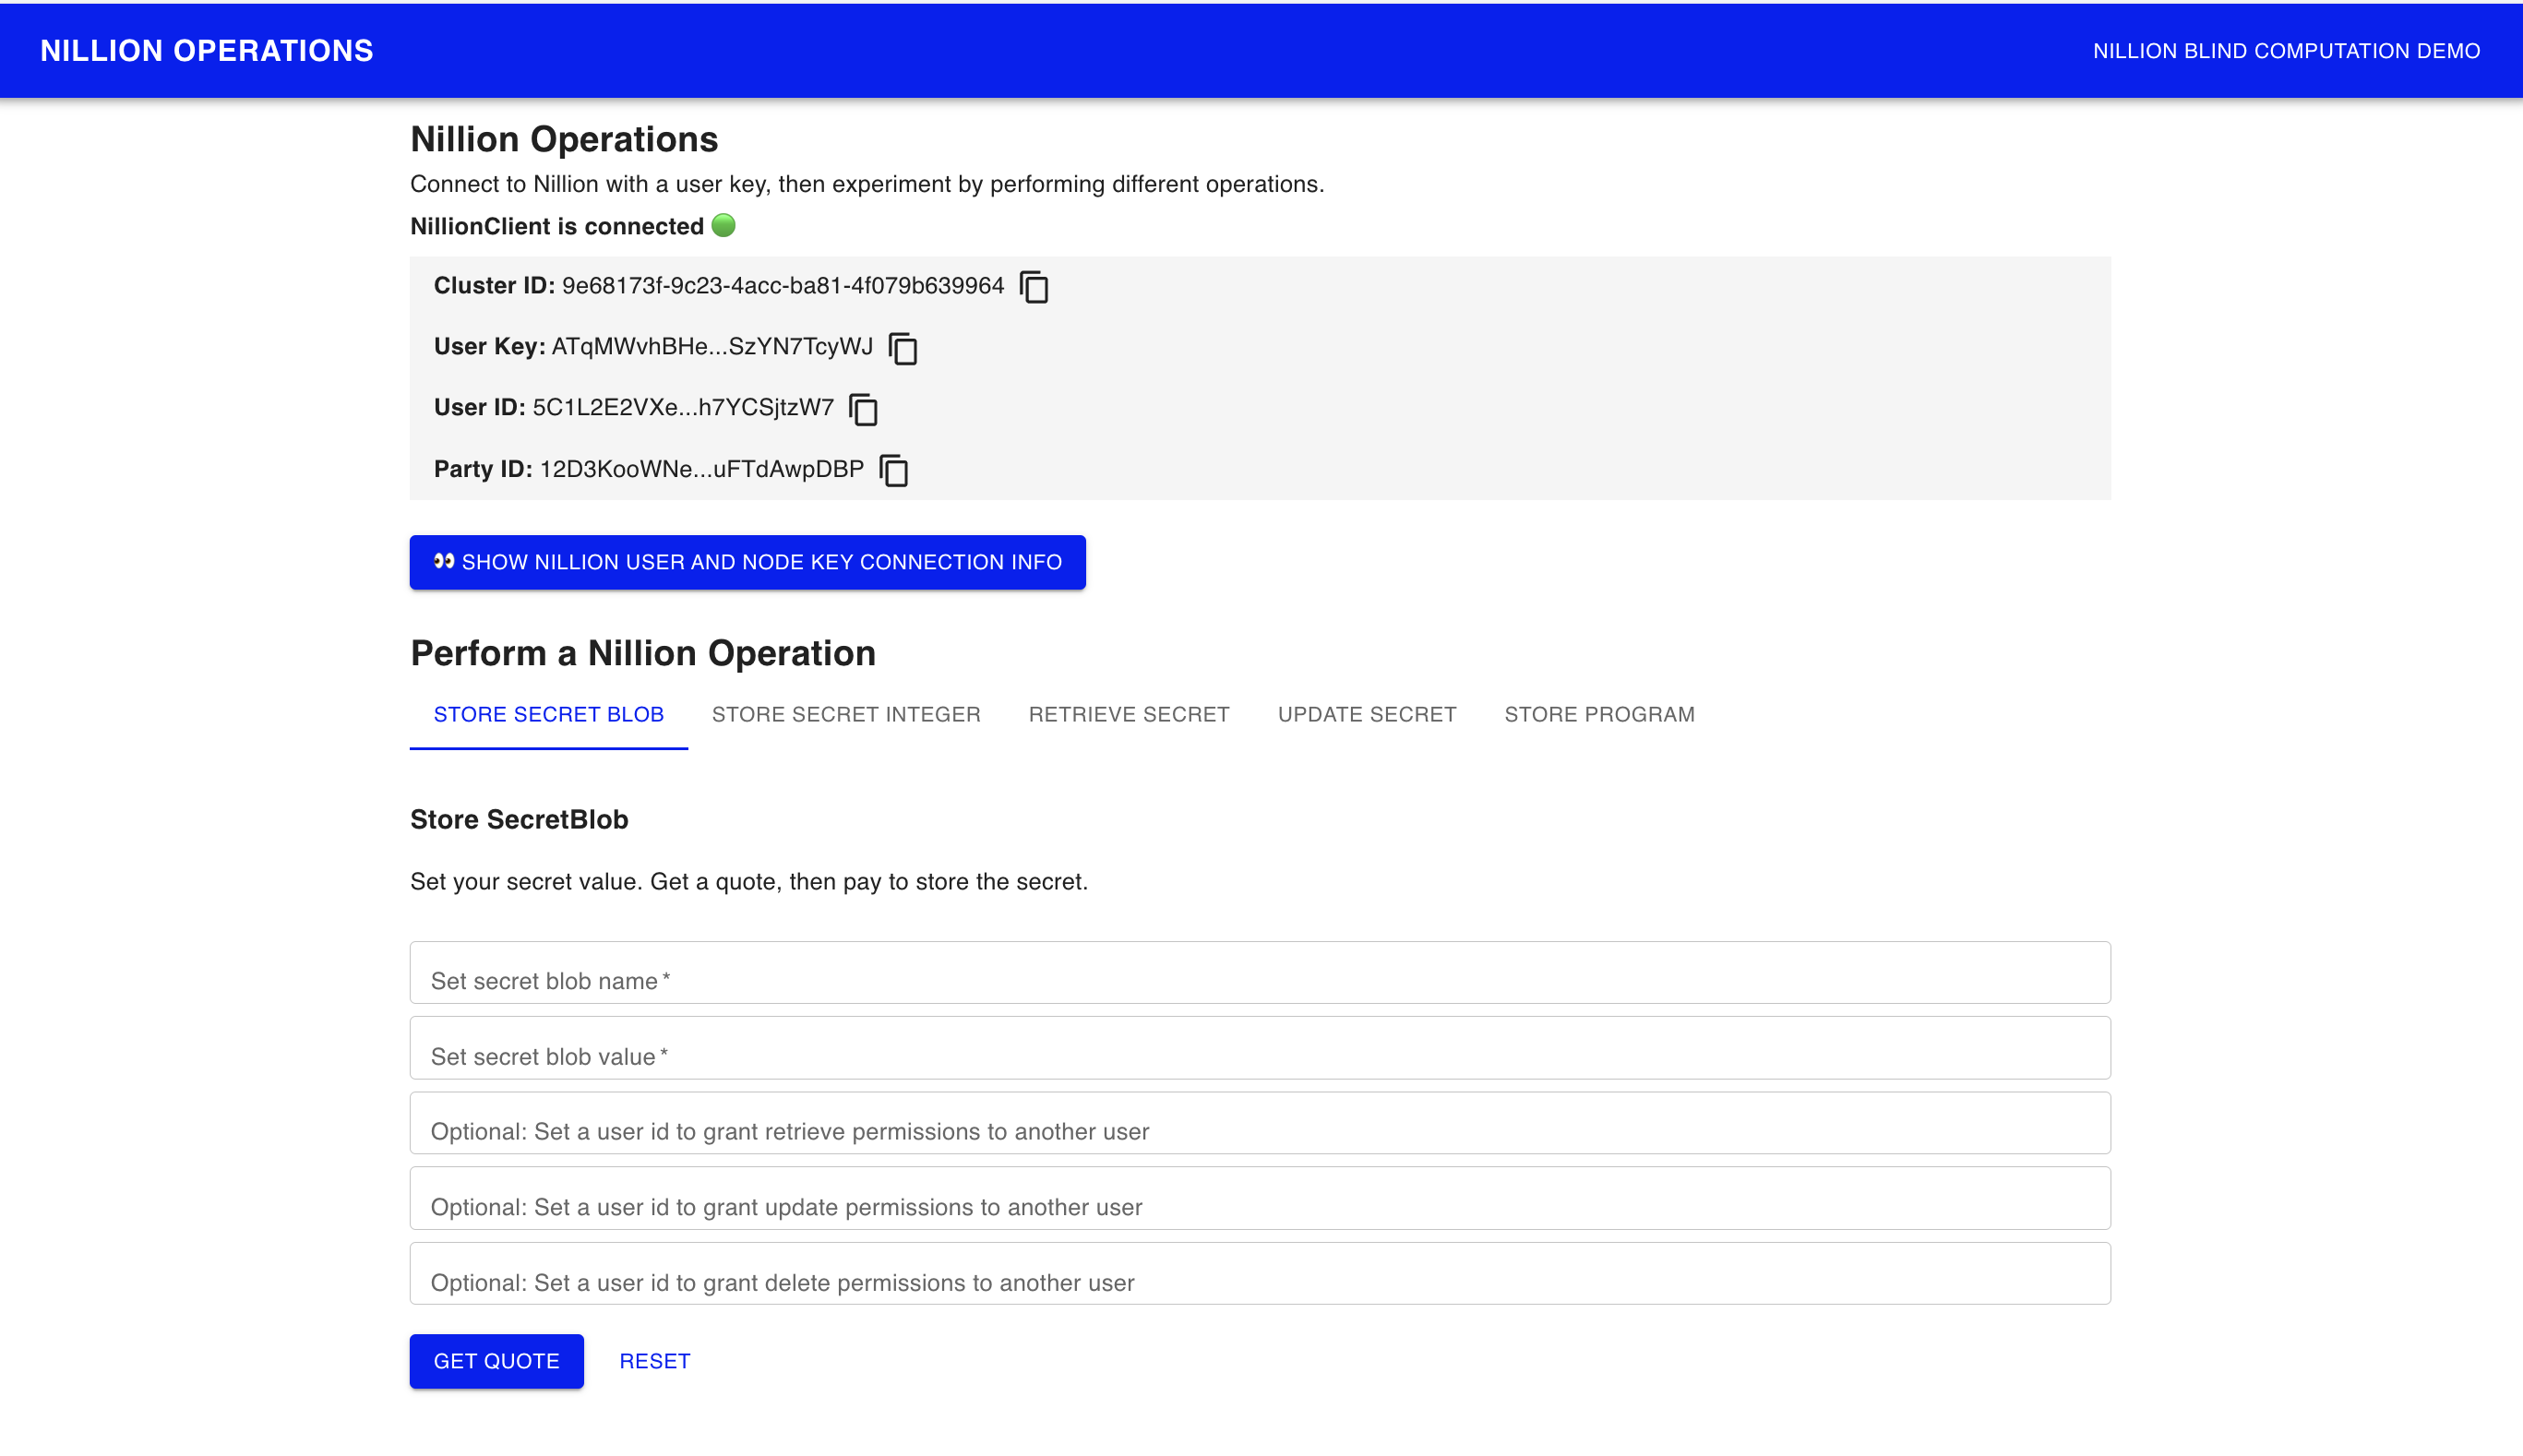
Try out the Operations Page
- Generate User Key - generates a new user key / user id pair
- Connect with User Key - sets the user key and connects to NillionClient via the Nillion JavaScript Client
- Hide Nillion User Key and Node Key Connection Info - toggle button to show/hide user and node key options
- Perform Nillion Operations
To perform an operation (store secret, retrieve secret, update secret, store program, compute), you follow the same pattern:
-
Get quote for the operation
-
Pay quote for the operation and get a payment receipt. On your local nillion-devnet, payments for operations are sent to the local nilchain at REACT_APP_NILLION_NILCHAIN_JSON_RPC are funded by REACT_APP_NILLION_NILCHAIN_PRIVATE_KEY
-
Perform the operation with the payment receipt as a parameter
Hook up your secret_addition.py nada program to your first blind app
Now that you understand how Nillion operations work, let's update the Nillion Blind Computation Demo page to use the Nada program you created.
Navigate to the Blind Computation Demo page: http://localhost:8080/compute
The code for Blind Computation Demo page lives in ComputePage.tsx
const outputName = 'my_output';
const partyName = 'Party1';
Notice that the ComputePage sets outputName which matches the the output name set in secret_addition.py. The ComputePage sets partyName which matches the the party name set in secret_addition.py. There are 2 StoreSecretForm components on ComputePage, with secretName set to my_int1 and my_int2 which matches the the secret names set in secret_addition.py.
- secret_addition.py
- ComputePage.tsx
from nada_dsl import *

def nada_main():

    party1 = Party(name="Party1")

    my_int1 = SecretInteger(Input(name="my_int1", party=party1))

    my_int2 = SecretInteger(Input(name="my_int2", party=party1))

    new_int = my_int1 + my_int2

    return [Output(new_int, "my_output", party1)]
loading...
Update programName
In order to run blind computation on your secret_addition.py Nada program, you'll need to make a few updates:
- Open a new terminal and navigate to the root
quickstartfolder. List the contents of the folder
ls
You should see cra-nillion and nada_quickstart_programs folders.
- Copy your secret_addition.py and secret_addition.nada.bin files nada_quickstart_programs into cra-nillion
cp nada_quickstart_programs/src/secret_addition.py cra-nillion/public/programs
cp nada_quickstart_programs/target/secret_addition.nada.bin cra-nillion/public/programs
Now your cra-nillion app can use the nada program and the nada program binaries in store program operations.
- Update programName to
secret_additionso the cra-nillion repo reads your Nada program.
// const programName = 'addition_simple'; <-- Change the string
const programName = "secret_addition";
Open the Nillion JavaScript Client Reference doc in another tab to search for available Nillion Client classes while working with cra-nillion.
Run the Blind Computation Demo
Go back to the Blind App on http://localhost:8080/compute and run through the steps on the page to test out the full blind computation flow.
- NextJS
Installation of a new NextJS App
Let's get started with the Next application.
npx create-next-app@latest nillion-app- Select
yeswhen it asks to use the app router option. - Select
nowhen it asks to use the pages router option.
Install repo dependencies
Then add the below packages to your fresh React / Next.js app.
- npm
- yarn
npm i @nillion/client-core@latest @nillion/client-vms@latest @nillion/client-react-hooks@latest
yarn add @nillion/client-core@latest @nillion/client-vms@latest @nillion/client-react-hooks@latest
Update your next.config.mjs.
This is necessary to help adjust the HTTP Headers, allows the use of browser web-workers and provide access to the nilchain.
/** @type {import("next").NextConfig} */
const nextConfig = {
webpack: (
    config,
    { buildId, dev, isServer, defaultLoaders, nextRuntime, webpack }
) => {
    config.resolve.fallback = {
    crypto: false,
    stream: false,
    buffer: false,
    vm: false,
    };

    config.module.rules.push({
    test: /\.wasm$/,
    type: "asset/resource",
    });

    return config;
},
async headers() {
    return [
    {
        source: "/:path*",
        headers: [
        { key: "Cross-Origin-Embedder-Policy", value: "require-corp" },
        { key: "Cross-Origin-Opener-Policy", value: "same-origin" },
        ],
    },
    ];
},
async rewrites() {
    return [
    {
        source: "/nilchain",
        destination: "http://127.0.0.1:48102/",
    },
    ];
},
};
export default nextConfig;
Create the NillionClient
This step will help you initialize the NillionClientProvider over your application.
Note: If network: NamedNetwork.enum.Devnet is provided, then we don't need to specify bootnodes, cluster or chain since these values are copied from the partial config.
The configurations can be referenced here.
- NextJS ( App Router)
- NextJS (Pages Router)
    //page.tsx
    “use client”;

    import Home from “../components/Home”;
    import { NamedNetwork } from “@nillion/client-core”;
    import { NillionClientProvider } from “@nillion/client-react-hooks”;
    import { NillionClient } from “@nillion/client-vms”;
    import { createSignerFromKey } from “@nillion/client-payments”;
    const client = NillionClient.create({
    network: NamedNetwork.enum.Devnet,
    overrides: async () => {
        // first account when running `nillion-devnet` with default seed
        const signer = await createSignerFromKey(
        “9a975f567428d054f2bf3092812e6c42f901ce07d9711bc77ee2cd81101f42c5”
        );
        return {
        endpoint: “http://localhost:8080/nilchain”,
        signer,
        userSeed: “nillion-devnet”,
        nodeSeed: Math.random().toString(),
        bootnodes: [
            “/ip4/127.0.0.1/tcp/54936/ws/p2p/12D3KooWMvw1hEqm7EWSDEyqTb6pNetUVkepahKY6hixuAuMZfJS”,
        ],
        cluster: “9e68173f-9c23-4acc-ba81-4f079b639964”,
        chain: “nillion-chain-devnet”,
        };
    },
    });
    export default function App() {
    return (
        <NillionClientProvider client={client}>
            <Home />
        </NillionClientProvider>
    );
    }
    //index.tsx

    import * as React from "react";
    import { NamedNetwork } from "@nillion/client-core";
    import { createSignerFromKey } from "@nillion/client-payments";
    import { NillionClientProvider } from "@nillion/client-react-hooks";
    import { NillionClient } from "@nillion/client-vms";
    import type { AppProps } from "next/app";
    import "../styles/globals.css";

    export const client = NillionClient.create({
        network: NamedNetwork.enum.Devnet,
        overrides: async () => {
            const signer = await createSignerFromKey(
            process.env.NEXT_PUBLIC_NILLION_NILCHAIN_PRIVATE_KEY!
        );
        return {
        signer,
            endpoint: process.env.NEXT_PUBLIC_NILLION_ENDPOINT,
            cluster: process.env.NEXT_PUBLIC_NILLION_CLUSTER_ID,
            bootnodes: [process.env.NEXT_PUBLIC_NILLION_BOOTNODE_WEBSOCKET],
            chain: process.env.NEXT_PUBLIC_CHAIN,
            userSeed: process.env.NEXT_PUBLIC_NILLION_USER_SEED,
            nodeSeed: Math.random().toString(),
            };
        },
    });

    export default function App({ Component, pageProps }: AppProps) {
        return (
            <NillionClientProvider client={client}>
                <Component {...pageProps} />
            </NillionClientProvider>
        );
    }
We have provided some ENV environments, copy this into a new .env.
// DevNet
NEXT_PUBLIC_NILLION_CLUSTER_ID="9e68173f-9c23-4acc-ba81-4f079b639964"
NEXT_PUBLIC_NILLION_BOOTNODE_WEBSOCKET="/ip4/127.0.0.1/tcp/54936/ws/p2p/12D3KooWMvw1hEqm7EWSDEyqTb6pNetUVkepahKY6hixuAuMZfJS"
NEXT_PUBLIC_NILLION_ENDPOINT=http://localhost:3000/nilchain
NEXT_PUBLIC_API_BASE_PATH=/nilchain-proxy
NEXT_PUBLIC_CHAIN="nillion-chain-devnet"
NEXT_PUBLIC_NILLION_USER_SEED="nillion-devnet"
NEXT_PUBLIC_NILLION_NILCHAIN_PRIVATE_KEY="9a975f567428d054f2bf3092812e6c42f901ce07d9711bc77ee2cd81101f42c5"
Update your app.tsx
For App Router applications - do this in your components/Home.tsx
loading...
Initializing the nillion-devnet
In order to interact with the nillion developer network (devnet), we will use need to spin up the local development cluster with nilup.
The nilchain spawned with nillion-devnet does not support CORS. The recommended workaround is proxy requests to nilchain for local development.
In a separate terminal, run nillion-devnet and allow connections to pass if prompted. The following below should be the output you see.
    nillion-app % nillion-devnet
    ℹ️ cluster id is 9e68173f-9c23-4acc-ba81-4f079b639964
    ℹ️ using 256 bit prime
    ℹ️ storing state in /var/folders/f4/cqlsh9k167vcx1swjlh_6pp80000gn/T/.tmpd3wwtD (123.08Gbs available)
    🏃 starting nilchain node in: /var/folders/f4/cqlsh9k167vcx1swjlh_6pp80000gn/T/.tmpd3wwtD/nillion-chain
    ⛓  nilchain JSON RPC available at http://127.0.0.1:48102
    ⛓  nilchain REST API available at http://localhost:26650
    ⛓  nilchain gRPC available at localhost:26649
    🏃 starting node 12D3KooWMvw1hEqm7EWSDEyqTb6pNetUVkepahKY6hixuAuMZfJS
    ⏳ waiting until bootnode is up...
    🏃 starting node 12D3KooWAiwGZUwSUaT2bYVxGS8jmfMrfsanZYkHwH3uL7WJPsFq
    🏃 starting node 12D3KooWM3hsAswc7ZT6VpwQ1TCZU4GCYY55nLhcsxCcfjuixW57
    👛 funding nilchain keys
    📝 nillion CLI configuration written to /Users/XXX/.config/nillion/nillion-cli.yaml
    🌄 environment file written to /Users/XXX/.config/nillion/nillion-devnet.env
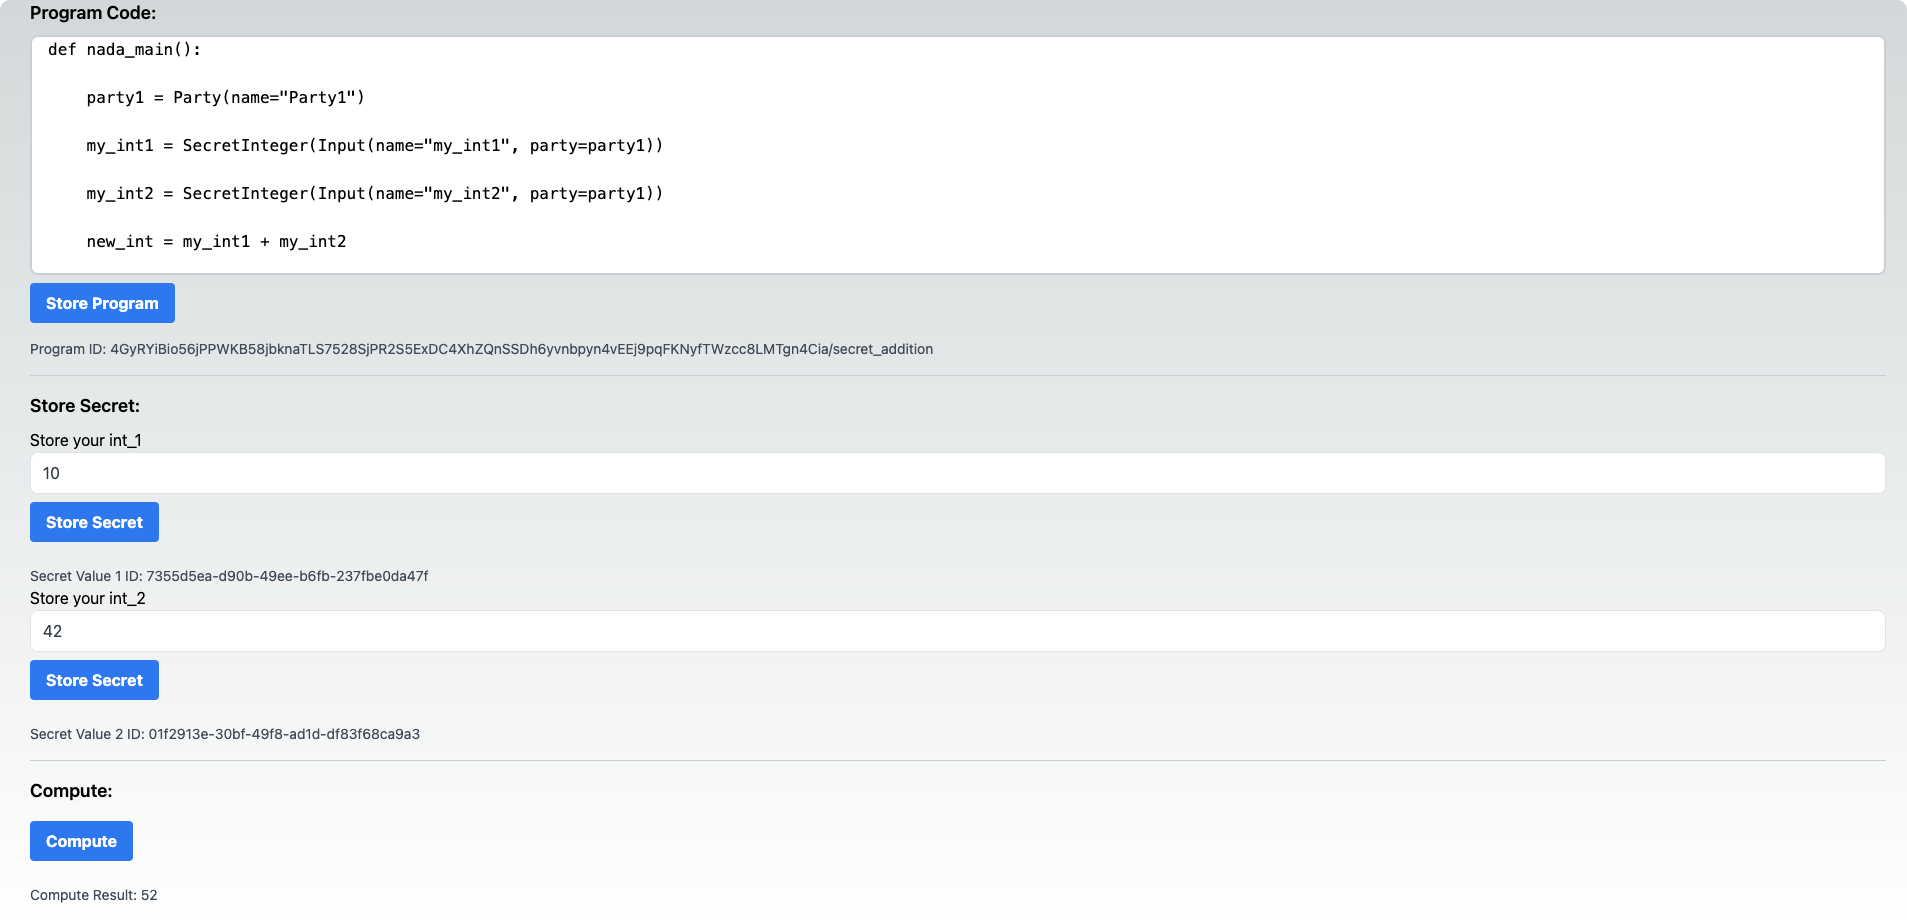
Interact with your app
42 is a SecretInteger we have hard coded to store. Feel free to press the store button and then it should pass with a success.
Amazing - you have interacted with a Nada based app on your front end! 🥳
Hook up your secret_addition.py Nada program to your first blind app
Now we want to complete the full-stack Nada application experience and connect the secret_addition program we wrote earlier.
This is what our application will look like:
In your nextjs directory - create programs directory in public.
cp nada_quickstart_programs/src/secret_addition.py nillion-app/public/programs
cp nada_quickstart_programs/target/secret_addition.nada.bin nillion-app/public/programs
Then in pages, add a new directory called compute to have a separate page for the compute page.
Also we need to add one utility file to our app so create a directory called utils and add a file called transformNadaProgramToUint8Array.ts. This will be explained in the next section.
export const transformNadaProgramToUint8Array = async (
    publicProgramPath: string // `./programs/${programName}.nada.bin`
): Promise<Uint8Array> => {
    try {
    const response = await fetch(publicProgramPath);
    if (!response.ok) {
        throw new Error(`Failed to fetch program: ${response.statusText}`);
    }

    const arrayBuffer = await response.arrayBuffer();
    return new Uint8Array(arrayBuffer);
    } catch (error) {
    console.error('Error fetching and transforming program:', error);
    throw error;
    }
};
Your currently directory tree should be looking like:
- App Router
- Pages Router
├── app
│   ├── layout.tsx
│   ├── page.tsx
│   ├── compute
│   │   └── page.tsx
├── postcss.config.mjs
├── public
│   ├── favicon.ico
│   ├── next.svg
│   ├── programs
│   │   ├── secret_addition.nada.bin
│   │   └── secret_addition.py
│   └── vercel.svg
├── styles
│   └── globals.css
├── tailwind.config.ts
├── tsconfig.json
└── utils
    └── transformNadaProgramToUint8Array.ts
├── pages
│   ├── _app.tsx
│   ├── _document.tsx
│   ├── api
│   │   └── hello.ts
│   ├── compute
│   │   └── index.tsx
│   └── index.tsx
├── postcss.config.mjs
├── public
│   ├── favicon.ico
│   ├── next.svg
│   ├── programs
│   │   ├── secret_addition.nada.bin
│   │   └── secret_addition.py
│   └── vercel.svg
├── styles
│   └── globals.css
├── tailwind.config.ts
├── tsconfig.json
└── utils
    └── transformNadaProgramToUint8Array.ts
Using the Hooks
We will now be using the react-hooks from the @nillion/client-react-hooks to store programs, store values and use the respective program (i.e. secret_addition).
Copy the following snippet into your compute/page.tsx / compute/index.tsx page. We will be going through each section.
We are using several hooks:
useNillion: Access to the Nillion ClientProvider we added in previosuly.useStoreProgram: Store our program with NadauseStoreValue: Store values with NadauseRunProgram: Run the Nada ProgramuseFetchProgramOutput: Fetch the Program Output / computation.
The useStates are for storing the data values that we want to parse through into the
selectedProgramCode: This is to grab the Nada Code Snippet from secret_additonsecretValue1: The secret value we want to inputsecretValue2:The secret value we want to inputprogramID: The Nada program IDsecretValue1ID: The ID after we stored the secret value 1secretValue2ID: The ID after we stored the secret value 2computeID: The response ID we receive after running the programcomputeResult: The result of the computation from the program
The constants relate the Nada program we wrote:
PARTY_NAME: Name of the partyPROGRAM_NAME: Name of the program
Functions
-
The first
useEffectallows us to fetch the Nada Program Code to display in our rendering. -
The
handleStoreProgramfunction allows us to store the Program which takes in two arguments:name: ProgramName | string;program: Uint8Array;- The programName is a string and in our constants that was mentioned previously
- The program binary is related to the .nada.bin file we copied in our
publicfolder and is processed in thetransformNadaProgramToUint8Array.tsfile we added inutils.
-
The
handleStoreSecretInteger1&handleStoreSecretInteger2function allows us to store the secret integer values with Nada. It takes in thevalueyou want to store wih ttl for time and permissions for allowing the user to compute to the program. -
The
handleUseProgramfunction allows us to use the stored program and takes in several arguments:- bindings: Association to the program with regards to the
programIDand who is theinputPartyandOutputParty - values: NadaValues of what you are parsing through
- storeIds: The storeIDs of previous storedValues.
- bindings: Association to the program with regards to the
-
The last UseEffect is for fetching the computeResult via the
useFetchProgramOutputreact hook.
Rendering
The rendering uses tailwind and divided into several sections. Feel free to adjust the styles and approach.
- The Program Code + Storing it with Nada
- Store Secret Integer 1
- Store Secret Integer 2
- Compute the Result of above integers.
import * as React from "react";
import {
useRunProgram,
useStoreValue,
useStoreProgram,
useNillion,
useFetchProgramOutput,
} from "@nillion/client-react-hooks";
import { useEffect, useState } from "react";
import {
ProgramId,
PartyName,
Permissions,
PartyId,
StoreId,
ProgramBindings,
NadaValues,
NadaValue,
NamedValue,
} from "@nillion/client-core";
import { transformNadaProgramToUint8Array } from "@/utils/transformNadaProgramToUint8Array";

export default function Compute() {
// Use of Nillion Hooks
const client = useNillion();
const storeProgram = useStoreProgram();
const storeValue = useStoreValue();
const runProgram = useRunProgram();
const fetchProgram = useFetchProgramOutput({
    id: computeID,
});

// UseStates
const [selectedProgramCode, setSelectedProgramCode] = useState("");
const [secretValue1, setSecretValue1] = useState<number>(0);
const [secretValue2, setSecretValue2] = useState<number>(0);
const [programID, setProgramID] = useState<ProgramId>();
const [secretValue1ID, setSecretValue1ID] = useState<StoreId>();
const [secretValue2ID, setSecretValue2ID] = useState<StoreId>();
const [computeResult, setComputeResult] = useState<any | null>(null);
const [computeID, setComputeID] = useState<any | null>(null);

// Other CONSTS
const PARTY_NAME = "Party1" as PartyName;
const PROGRAM_NAME = "secret_addition";

// Fetch Nada Program Code.
useEffect(() => {
    const fetchProgramCode = async () => {
    const response = await fetch(`./programs/secret_addition.py`);
    const text = await response.text();
    setSelectedProgramCode(text);
    };
    fetchProgramCode();
}, [selectedProgramCode]);


// Action to store Program with Nada
const handleStoreProgram = async () => {
    try {
    const programBinary = await transformNadaProgramToUint8Array(
        `./programs/${PROGRAM_NAME}.nada.bin`
    );
    const result = await storeProgram.mutateAsync({
        name: PROGRAM_NAME,
        program: programBinary,
    });
    setProgramID(result!);
    } catch (error) {
    console.log("error", error);
    }
};

// Action to handle storing secret integer 1
const handleStoreSecretInteger1 = async () => {
    try {
    const permissions = Permissions.create().allowCompute(
        client.vm.userId,
        programID as ProgramId
    );

    const result = await storeValue.mutateAsync({
        values: {
        mySecretInt: secretValue1,
        },
        ttl: 3600,
        permissions,
    });
    setSecretValue1ID(result);
    } catch (error) {
    console.error("Error storing SecretInteger:", error);
    }
};

// Action to handle storing secret integer 2
const handleStoreSecretInteger2 = async () => {
    try {
    const permissions = Permissions.create().allowCompute(
        client.vm.userId,
        programID as ProgramId
    );
    const result = await storeValue.mutateAsync({
        values: {
        mySecretInt: secretValue2,
        },
        ttl: 3600,
        permissions,
    });
    console.log("Stored SecretInteger2:", result);
    setSecretValue2ID(result);
    } catch (error) {
    console.error("Error storing SecretInteger2:", error);
    }
};

// Handle using the secret_addition Program
const handleUseProgram = async () => {
    try {
    // Bindings
    const bindings = ProgramBindings.create(programID!);
    bindings.addInputParty(
        PARTY_NAME as PartyName,
        client.vm.partyId as PartyId
    );
    bindings.addOutputParty(
        PARTY_NAME as PartyName,
        client.vm.partyId as PartyId
    );

    const values = NadaValues.create()
        .insert(
        NamedValue.parse("my_int1"),
        NadaValue.createSecretInteger(secretValue1)
        )
        .insert(
        NamedValue.parse("my_int2"),
        NadaValue.createSecretInteger(secretValue2)
        );

    const res = await runProgram.mutateAsync({
        bindings: bindings,
        values,
        storeIds: [],
    });

    setComputeID(res);
    } catch (error) {
    console.error("Error executing program:", error);
    throw error;
    }
};

// Fetch the new compute result
useEffect(() => {
    if (fetchProgram.data) {
    setComputeResult(fetchProgram.data.my_output.toString());
    }
}, [fetchProgram.data]);

return (
    <div className="flex flex-col justify-center min-h-screen p-8">
    {/* Store Programs Section */}
    <div className="mt-4">
        <h3 className="text-lg font-semibold mb-2">Program Code:</h3>
        <div className="border-2 border-gray-300 rounded-lg p-4 max-h-60 overflow-y-auto bg-white">
            <pre className="whitespace-pre-wrap break-words">
                <code>{selectedProgramCode}</code>
            </pre>
        </div>
        <button
        onClick={() => handleStoreProgram()}
        className="bg-blue-500 hover:bg-blue-600 text-white font-bold py-2 px-4 rounded transition duration-300 ease-in-out mt-2 inline-block"
        >
            Store Program
        </button>
    </div>

    {programID && (
        <div className="mt-4">
            <p className="text-sm text-gray-600">Program ID: {programID}</p>
        </div>
    )}

    <div className="border-t border-gray-300 my-4"></div>

    {/* Store Secrets Section */}
    <div>
        <h3 className="text-lg font-semibold mb-2 text-left">Store Secret:</h3>
        <p> Store your int_1</p>
        <input
            placeholder="Enter your secret value"
            value={secretValue1}
            onChange={(e) => setSecretValue1(Number(e.target.value))}
            className="w-full px-3 py-2 text-gray-700 border rounded-lg focus:outline-none focus:border-blue-500"
        />
        <button
            onClick={() => handleStoreSecretInteger1()}
            className="bg-blue-500 mb-4 hover:bg-blue-600 text-white font-bold py-2 px-4 rounded transition duration-300 ease-in-out mt-2"
        >
            Store Secret
        </button>

        {secretValue1ID && (
        <div className="mt-4">
            <p className="text-sm text-gray-600">
                Secret Value 1 ID: {secretValue1ID}
            </p>
        </div>
        )}

        <p> Store your int_2</p>
        <input
            placeholder="Enter your secret value"
            value={secretValue2}
            onChange={(e) => setSecretValue2(Number(e.target.value))}
            className="w-full px-3 py-2 text-gray-700 border rounded-lg focus:outline-none focus:border-blue-500"
        />
        <button
            onClick={() => handleStoreSecretInteger2()}
            className="bg-blue-500 mb-4 hover:bg-blue-600 text-white font-bold py-2 px-4 rounded transition duration-300 ease-in-out mt-2"
        >
            Store Secret
        </button>

        {secretValue2ID && (
        <div className="mt-4">
            <p className="text-sm text-gray-600">
                Secret Value 2 ID: {secretValue2ID}
            </p>
        </div>
        )}
    </div>

    <div className="border-t border-gray-300 my-4"></div>

    {/* Compute Section */}
    <div>
        <h3 className="text-lg font-semibold mb-2 text-left">Compute:</h3>
        <button
            onClick={() => handleUseProgram()}
            className="bg-blue-500 mb-4 hover:bg-blue-600 text-white font-bold py-2 px-4 rounded transition duration-300 ease-in-out mt-2"
        >
            Compute
        </button>
        {computeResult && (
        <div className="mt-4">
            <p className="text-sm text-gray-600">
                Compute Result: {computeResult}
            </p>
        </div>
        )}
    </div>
</div>
);
}
Next steps
🚀 Woohoo! You've successfully built your first local blind app by writing a Nada program, storing the program on the network, storing secrets on the network, and running compute against secrets. Next, deploy your blind app to the Nillion Network Testnet so anyone in the world can try it.